Ubuntu 24.04.2安装调整k8s 1.35.0
本文使用cilium 替代kube-proxy
1、Ubuntu 24.04.2安装k8s 1.35.0
软件版本:
ubuntu24.04.2,
kubeadm v1.33.34
kubernetes v1.33.4
containerd v2.0.2
cilium version v1.18.0
机器 地址 系统
node1 192.168.2.25 Ubuntu 24.04.2 LTS master
node2 192.168.2.26 Ubuntu 24.04.2 LTS node
第一步、基础设置
所有机器均需要操作
关闭swap
sed -ri 's/^([^#].*swap.*)$/#\1/' /etc/fstab && grep swap /etc/fstab && swapoff -a && free -h关闭防火墙
ufw disable设置时区
timedatectl set-timezone Asia/Shanghai
systemctl restart systemd-timesyncd.service
开启ipv4转发
cat <
应用配置(等效于 sysctl -p /etc/sysctl.d/k8s.conf)
sysctl --system
sysctl net.ipv4.ip_forward
配置hostname以及hosts
cat >> /etc/hosts << EOF
192.168.2.25 ops-test-025
192.168.2.26 ops-test-026
EOF
第二步:安装containerd
所有节点均需操作
2.1 下载和配置containerd
从 https://github.com/containerd/containerd/releases 下载
二进制文件是为基于 glibc 的 Linux 发行版(如 Ubuntu 和 Rocky Linux)动态构建的。 此二进制文件可能不适用于基于 musl 的发行版,例如 Alpine Linux。 此类发行版的用户可能必须从源或第三方软件包安装 containerd
旧的 Linux 发行版上不起作用,并将在 containerd 2.0 中删除。cri-containerd-xx
(containerd2.x文档) https://github.com/containerd/containerd/blob/main/docs/containerd-2.0.md
wget https://github.com/containerd/containerd/releases/download/v2.0.2/containerd-2.0.2-linux-amd64.tar.gz
apt install runc
$ tar Cxzvf /usr/local containerd-2.0.2-linux-amd64.tar.gz
bin/
bin/containerd-shim-runc-v2
bin/containerd-shim
bin/ctr
bin/containerd-shim-runc-v1
bin/containerd
bin/containerd-stress
mkdir -p /etc/containerd && containerd config default > /etc/containerd/config.toml
sed -i "s#registry.k8s.io/pause:3.10#registry.aliyuncs.com/google_containers/pause:3.10#g" /etc/containerd/config.toml
#添加SystemdCgroup = true参数
sed -i "/ShimCgroup = ''/a \ SystemdCgroup = true" /etc/containerd/config.toml
#安装containerd.service官网提供的
wget -P https://raw.githubusercontent.com/containerd/containerd/main/containerd.service /etc/systemd/system/
systemctl daemon-reload
systemctl enable --now containerd
systemctl status containerd.service
2.2 安装crictl
CRICTL_VERSION=v1.35.0
wget https://github.com/kubernetes-sigs/cri-tools/releases/download/$CRICTL_VERSION/crictl-$CRICTL_VERSION-linux-amd64.tar.gz
tar zxvf crictl-$CRICTL_VERSION-linux-amd64.tar.gz -C /usr/local/bin
2.3 配置私有Harbor镜像仓库
修改配置
大概在52行开始
vim +52 /etc/containerd/config.toml51 [plugins.'io.containerd.cri.v1.images'.registry]52 config_path = '/etc/containerd/certs.d' #修改该行的配置信息
重新启动containerd
第三步:安装K8S组件
更新源
sudo apt update && sudo apt upgrade -y
安装工具
apt install -y apt-transport-https ca-certificates curl gpg
创建目录,有的版本有,看情况创建
mkdir -p -m 755 /etc/apt/keyrings
下载秘钥
curl -fsSL https://pkgs.k8s.io/core:/stable:/v1.35/deb/Release.key | \
sudo gpg --dearmor -o /etc/apt/keyrings/kubernetes-apt-keyring.gpg && \
sudo chmod 644 /etc/apt/keyrings/kubernetes-apt-keyring.gpg
# 添加软件源1.35.0
echo ‘deb [signed-by=/etc/apt/keyrings/kubernetes-apt-keyring.gpg] https://pkgs.k8s.io/core:/stable:/v1.35/deb/ /’ | sudo tee /etc/apt/sources.list.d/kubernetes.list
# 更新,安装软件,防止更新
apt update &&
apt install kubelet kubectl kubeadm &&
apt-mark hold kubelet kubeadm kubectl
设置开机自启
systemctl enable --now kubelet
查看版本
kubeadm version
root@ops-test-025:~# kubeadm version
kubeadm version: &version.Info{Major:"1", Minor:"35", EmulationMajor:"", EmulationMinor:"", MinCompatibilityMajor:"", MinCompatibilityMinor:"", GitVersion:"v1.35.0", GitCommit:"66452049f3d692768c39c797b21b793dce80314e", GitTreeState:"clean", BuildDate:"2025-12-17T12:39:26Z", GoVersion:"go1.25.5", Compiler:"gc", Platform:"linux/amd64"}
root@ops-test-025:~#
第四步:初始化集群
4.1 下载相关镜像
# 先下载阿里云镜像,node1节点即可,即master节点
sudo kubeadm config images pull
–image-repository=registry.aliyuncs.com/google_containers
–kubernetes-version=v1.35.0
–cri-socket=unix:///run/containerd/containerd.sock
root@ops-test-025:~# sudo kubeadm config images pull
–image-repository=registry.aliyuncs.com/google_containers
–kubernetes-version=v1.35.0
–cri-socket=unix:///run/containerd/containerd.sock
[config/images] Pulled registry.aliyuncs.com/google_containers/kube-apiserver:v1.35.0
[config/images] Pulled registry.aliyuncs.com/google_containers/kube-controller-manager:v1.35.0
[config/images] Pulled registry.aliyuncs.com/google_containers/kube-scheduler:v1.35.0
[config/images] Pulled registry.aliyuncs.com/google_containers/kube-proxy:v1.35.0
[config/images] Pulled registry.aliyuncs.com/google_containers/coredns:v1.13.1
[config/images] Pulled registry.aliyuncs.com/google_containers/pause:3.10.1
[config/images] Pulled registry.aliyuncs.com/google_containers/etcd:3.6.6-0
root@ops-test-025:~#
4.2 在master节点生成初始化集群的配置文件
kubeadm config print init-defaults > kubeadm-config.yaml
4.3 配置文件需要修改如下内容
# 修改kubeadm-config配置文件
vim kubeadm-config.yaml
管理节点的IP地址
advertiseAddress: 192.168.2.25
本机注册到集群后的节点名称
name: ops-test-025
#版本
kubernetesVersion: 1.35.0
#跳过kube-proxy 这装
nodeRegistration:
criSocket: unix:///var/run/containerd/containerd.sock
imagePullPolicy: IfNotPresent
imagePullSerial: true
name: ops-test-025
taints: null
skipPhases: # 添加在这里
- addon/kube-proxy # 关键:跳过 kube-proxy 安装
timeouts:
–增加如上两行
#在 networking 部分添加 podSubnet(必须与后续 Cilium 的 ipv4NativeRoutingCIDR 一致)
networking:
dnsDomain: cluster.local
serviceSubnet: 10.96.0.0/12
podSubnet: 10.244.0.0/16 # 新增此行
集群镜像下载地址,修改为阿里云
imageRepository: registry.cn-hangzhou.aliyuncs.com/google_containers
4.4 通过配置文件初始化集群
kubeadm init --config kubeadm-config.yaml
—执行结果-----
root@ops-test-025:~# kubeadm init --config kubeadm-config.yaml
[init] Using Kubernetes version: v1.35.0
[preflight] Running pre-flight checks
[preflight] Pulling images required for setting up a Kubernetes cluster
[preflight] This might take a minute or two, depending on the speed of your internet connection
[preflight] You can also perform this action beforehand using 'kubeadm config images pull'
[certs] Using certificateDir folder "/etc/kubernetes/pki"
[certs] Generating "ca" certificate and key
[certs] Generating "apiserver" certificate and key
[certs] apiserver serving cert is signed for DNS names [kubernetes kubernetes.default kubernetes.default.svc kubernetes.default.svc.cluster.local ops-test-025] and IPs [10.96.0.1 192.168.2.25]
[certs] Generating "apiserver-kubelet-client" certificate and key
[certs] Generating "front-proxy-ca" certificate and key
[certs] Generating "front-proxy-client" certificate and key
[certs] Generating "etcd/ca" certificate and key
[certs] Generating "etcd/server" certificate and key
[certs] etcd/server serving cert is signed for DNS names [localhost ops-test-025] and IPs [192.168.2.25 127.0.0.1 ::1]
[certs] Generating "etcd/peer" certificate and key
[certs] etcd/peer serving cert is signed for DNS names [localhost ops-test-025] and IPs [192.168.2.25 127.0.0.1 ::1]
[certs] Generating "etcd/healthcheck-client" certificate and key
[certs] Generating "apiserver-etcd-client" certificate and key
[certs] Generating "sa" key and public key
[kubeconfig] Using kubeconfig folder "/etc/kubernetes"
[kubeconfig] Writing "admin.conf" kubeconfig file
[kubeconfig] Writing "super-admin.conf" kubeconfig file
[kubeconfig] Writing "kubelet.conf" kubeconfig file
[kubeconfig] Writing "controller-manager.conf" kubeconfig file
[kubeconfig] Writing "scheduler.conf" kubeconfig file
[etcd] Creating static Pod manifest for local etcd in "/etc/kubernetes/manifests"
[control-plane] Using manifest folder "/etc/kubernetes/manifests"
[control-plane] Creating static Pod manifest for "kube-apiserver"
[control-plane] Creating static Pod manifest for "kube-controller-manager"
[control-plane] Creating static Pod manifest for "kube-scheduler"
[kubelet-start] Writing kubelet environment file with flags to file "/var/lib/kubelet/kubeadm-flags.env"
[kubelet-start] Writing kubelet configuration to file "/var/lib/kubelet/instance-config.yaml"
[patches] Applied patch of type "application/strategic-merge-patch+json" to target "kubeletconfiguration"
[kubelet-start] Writing kubelet configuration to file "/var/lib/kubelet/config.yaml"
[kubelet-start] Starting the kubelet
[wait-control-plane] Waiting for the kubelet to boot up the control plane as static Pods from directory "/etc/kubernetes/manifests"
[kubelet-check] Waiting for a healthy kubelet at http://127.0.0.1:10248/healthz. This can take up to 4m0s
[kubelet-check] The kubelet is healthy after 501.603456ms
[control-plane-check] Waiting for healthy control plane components. This can take up to 4m0s
[control-plane-check] Checking kube-apiserver at https://192.168.2.25:6443/livez
[control-plane-check] Checking kube-controller-manager at https://127.0.0.1:10257/healthz
[control-plane-check] Checking kube-scheduler at https://127.0.0.1:10259/livez
[control-plane-check] kube-controller-manager is healthy after 4.504224407s
[control-plane-check] kube-scheduler is healthy after 5.483148221s
[control-plane-check] kube-apiserver is healthy after 7.001703756s
[upload-config] Storing the configuration used in ConfigMap "kubeadm-config" in the "kube-system" Namespace
[kubelet] Creating a ConfigMap "kubelet-config" in namespace kube-system with the configuration for the kubelets in the cluster
[upload-certs] Skipping phase. Please see --upload-certs
[mark-control-plane] Marking the node ops-test-025 as control-plane by adding the labels: [node-role.kubernetes.io/control-plane node.kubernetes.io/exclude-from-external-load-balancers]
[mark-control-plane] Marking the node ops-test-025 as control-plane by adding the taints [node-role.kubernetes.io/control-plane:NoSchedule]
[bootstrap-token] Using token: abcdef.0123456789abcdef
[bootstrap-token] Configuring bootstrap tokens, cluster-info ConfigMap, RBAC Roles
[bootstrap-token] Configured RBAC rules to allow Node Bootstrap tokens to get nodes
[bootstrap-token] Configured RBAC rules to allow Node Bootstrap tokens to post CSRs in order for nodes to get long term certificate credentials
[bootstrap-token] Configured RBAC rules to allow the csrapprover controller automatically approve CSRs from a Node Bootstrap Token
[bootstrap-token] Configured RBAC rules to allow certificate rotation for all node client certificates in the cluster
[bootstrap-token] Creating the "cluster-info" ConfigMap in the "kube-public" namespace
[kubelet-finalize] Updating "/etc/kubernetes/kubelet.conf" to point to a rotatable kubelet client certificate and key
[addons] Applied essential addon: CoreDNS
Your Kubernetes control-plane has initialized successfully!
To start using your cluster, you need to run the following as a regular user:mkdir -p $HOME/.kubesudo cp -i /etc/kubernetes/admin.conf $HOME/.kube/configsudo chown $(id -u):$(id -g) $HOME/.kube/config
Alternatively, if you are the root user, you can run:export KUBECONFIG=/etc/kubernetes/admin.conf
You should now deploy a pod network to the cluster.
Run "kubectl apply -f [podnetwork].yaml" with one of the options listed at:https://kubernetes.io/docs/concepts/cluster-administration/addons/
Then you can join any number of worker nodes by running the following on each as root:
kubeadm join 192.168.2.25:6443 --token abcdef.0123456789abcdef \--discovery-token-ca-cert-hash sha256:7ebf1fdf1165585b1d11b47c7447a49a79ec83da9e4f35ca9f5960cf2ea83c35
4.5 据集群初始化后的提示,执行如下命令
mkdir -p $HOME/.kube
sudo cp -i /etc/kubernetes/admin.conf $HOME/.kube/config
sudo chown $(id -u):$(id -g) $HOME/.kube/config
4.6 其它节点加入集群
kubeadm join 192.168.2.25:6443 --token abcdef.0123456789abcdef \--discovery-token-ca-cert-hash sha256:7ebf1fdf1165585b1d11b47c7447a49a79ec83da9e4f35ca9f5960cf2ea83c35
root@ops-test-026:~# kubeadm join 192.168.2.25:6443 --token abcdef.0123456789abcdef \--discovery-token-ca-cert-hash sha256:7ebf1fdf1165585b1d11b47c7447a49a79ec83da9e4f35ca9f5960cf2ea83c35
[preflight] Running pre-flight checks
[preflight] Reading configuration from the "kubeadm-config" ConfigMap in namespace "kube-system"...
[preflight] Use 'kubeadm init phase upload-config kubeadm --config your-config-file' to re-upload it.
W1224 10:18:41.415972 1517 configset.go:77] Warning: No kubeproxy.config.k8s.io/v1alpha1 config is loaded. Continuing without it: configmaps "kube-proxy" is forbidden: User "system:bootstrap:abcdef" cannot get resource "configmaps" in API group "" in the namespace "kube-system"
[kubelet-start] Writing kubelet configuration to file "/var/lib/kubelet/instance-config.yaml"
[patches] Applied patch of type "application/strategic-merge-patch+json" to target "kubeletconfiguration"
[kubelet-start] Writing kubelet configuration to file "/var/lib/kubelet/config.yaml"
[kubelet-start] Writing kubelet environment file with flags to file "/var/lib/kubelet/kubeadm-flags.env"
[kubelet-start] Starting the kubelet
[kubelet-check] Waiting for a healthy kubelet at http://127.0.0.1:10248/healthz. This can take up to 4m0s
[kubelet-check] The kubelet is healthy after 504.577748ms
[kubelet-start] Waiting for the kubelet to perform the TLS Bootstrap
This node has joined the cluster:
* Certificate signing request was sent to apiserver and a response was received.
* The Kubelet was informed of the new secure connection details.
Run 'kubectl get nodes' on the control-plane to see this node join the cluster.
root@ops-test-026:~#
查看集群状态
root@ops-test-025:~# kubectl get nodes
NAME STATUS ROLES AGE VERSION
ops-test-025 Ready control-plane 16m v1.35.0
ops-test-026 Ready 73s v1.35.0
root@ops-test-025:~#
#验证节点 PodCIDR 分配
root@ops-test-025:~# kubectl get nodes -o jsonpath='{range .items[*]}{.metadata.name}{"\t"}{.spec.podCIDR}{"\n"}{end}'
ops-test-025 10.244.0.0/24
ops-test-026 10.244.2.0/24
4.7 部署Cilium工具
4.7.1. 安装 Cilium CLI 工具
curl -L --remote-name https://github.com/cilium/cilium-cli/releases/latest/download/cilium-linux-amd64.tar.gz
tar xzvf cilium-linux-amd64.tar.gz
sudo mv cilium /usr/local/bin
验证:
cilium version
4.7.2. 默认的VXLAN模式
cilium install
–set enableKubeProxyReplacement=true
–set kubeProxyReplacement=true
–set ipam.mode=kubernetes
–set tunnel=vxlan \ # 将路由模式改为 VXLAN
–set ipam.operator.clusterPoolIPv4PodCIDRList=10.244.0.0/16
–set ipam.operator.clusterPoolIPv4MaskSize=24
–set hubble.enabled=true
–set hubble.relay.enabled=true
–set hubble.ui.enabled=true
4.7.3. Cilium(Native-Routing 模式,云原生路由模式)
cilium install
–set enableKubeProxyReplacement=true
–set kubeProxyReplacement=true
–set ipam.mode=kubernetes
–set routingMode=native
–set ipam.operator.clusterPoolIPv4PodCIDRList=10.244.0.0/16
–set ipam.operator.clusterPoolIPv4MaskSize=24
–set ipv4NativeRoutingCIDR=10.244.0.0/16
–set autoDirectNodeRoutes=true
–set hubble.enabled=true
–set hubble.relay.enabled=true
–set hubble.ui.enabled=true
–set enableKubeProxyReplacement=true 显式启用 kube-proxy 替代功能 --set kubeProxyReplacement=strict 使用 Cilium 的 eBPF 功能完全替代 kube-proxy
–set ipam.mode=kubernetes 使用 Kubernetes 控制器进行 Pod IP 分配 --set routingMode=native 启用原生路由模式,节点间直接路由通信
–set ipam.operator.clusterPoolIPv4PodCIDRList=10.244.0.0/16 设置 Pod 网络地址池 --set ipam.operator.clusterPoolIPv4MaskSize=24 每个节点分配一个 /24 网段用于 Pod IP
–set ipv4NativeRoutingCIDR=10.244.0.0/16 指定原生路由可达的 Pod 网络范围 --set autoDirectNodeRoutes=true 自动添加节点间直连路由
–set hubble.enabled=true 启用 Hubble 网络流量观测功能 --set hubble.relay.enabled=true 启用 Hubble Relay(Hubble 数据中转服务)
–set hubble.ui.enabled=true` 启用 Hubble Web UI(可视化界面)
4.7.4. Native Routing + Cilium Ingress (云原生路由+启用ingress)
cilium install
–set kubeProxyReplacement=strict \ # 完全替换 kube-proxy
–set enableKubeProxyReplacement=true \ # 启用 kube-proxy 替换
–set ipam.mode=kubernetes \ # 使用 Kubernetes IPAM
–set routingMode=native \ # 启用 Native Routing
–set ipv4NativeRoutingCIDR=10.244.0.0/16 \ # 设置 Pod CIDR
–set autoDirectNodeRoutes=true \ # 自动管理节点路由
–set ingressController.enabled=true \ # 启用 Cilium Ingress Controller
–set ingressController.loadbalancerMode=dedicated \ # 使用专用 LB 模式(推荐)
–set hubble.enabled=true \ # 启用 Hubble
–set hubble.relay.enabled=true \ # 启用 Hubble Relay
–set hubble.ui.enabled=true # 启用 Hubble UI
4.8.本次安装采用Native-Routing 模式
执行结果如下:
root@ops-test-025:~# cilium install \--set enableKubeProxyReplacement=true \--set kubeProxyReplacement=true \--set ipam.mode=kubernetes \--set routingMode=native \--set ipam.operator.clusterPoolIPv4PodCIDRList=10.244.0.0/16 \--set ipam.operator.clusterPoolIPv4MaskSize=24 \--set ipv4NativeRoutingCIDR=10.244.0.0/16 \--set autoDirectNodeRoutes=true \--set hubble.enabled=true \--set hubble.relay.enabled=true \--set hubble.ui.enabled=true
ℹ️ Using Cilium version 1.18.3Auto-detected cluster name: kubernetesAuto-detected kube-proxy has not been installed
ℹ️ Cilium will fully replace all functionalities of kube-proxy
root@ops-test-025:~#
4.7.5 验证安装
cilium status
—验证结果
root@ops-test-025:~# cilium status/¯¯\/¯¯\__/¯¯\ Cilium: OK\__/¯¯\__/ Operator: OK/¯¯\__/¯¯\ Envoy DaemonSet: OK\__/¯¯\__/ Hubble Relay: OK\__/ ClusterMesh: disabled
DaemonSet cilium Desired: 2, Ready: 2/2, Available: 2/2
DaemonSet cilium-envoy Desired: 2, Ready: 2/2, Available: 2/2
Deployment cilium-operator Desired: 1, Ready: 1/1, Available: 1/1
Deployment hubble-relay Desired: 1, Ready: 1/1, Available: 1/1
Deployment hubble-ui Desired: 1, Ready: 1/1, Available: 1/1
Containers: cilium Running: 2cilium-envoy Running: 2cilium-operator Running: 1clustermesh-apiserverhubble-relay Running: 1hubble-ui Running: 1
Cluster Pods: 4/4 managed by Cilium
Helm chart version: 1.18.3
Image versions cilium quay.io/cilium/cilium:v1.18.3@sha256:5649db451c88d928ea585514746d50d91e6210801b300c897283ea319d68de15: 2cilium-envoy quay.io/cilium/cilium-envoy:v1.34.10-1761014632-c360e8557eb41011dfb5210f8fb53fed6c0b3222@sha256:ca76eb4e9812d114c7f43215a742c00b8bf41200992af0d21b5561d46156fd15: 2cilium-operator quay.io/cilium/operator-generic:v1.18.3@sha256:b5a0138e1a38e4437c5215257ff4e35373619501f4877dbaf92c89ecfad81797: 1hubble-relay quay.io/cilium/hubble-relay:v1.18.3@sha256:e53e00c47fe4ffb9c086bad0c1c77f23cb968be4385881160683d9e15aa34dc3: 1hubble-ui quay.io/cilium/hubble-ui-backend:v0.13.3@sha256:db1454e45dc39ca41fbf7cad31eec95d99e5b9949c39daaad0fa81ef29d56953: 1hubble-ui quay.io/cilium/hubble-ui:v0.13.3@sha256:661d5de7050182d495c6497ff0b007a7a1e379648e60830dd68c4d78ae21761d: 1
root@ops-test-025:~#
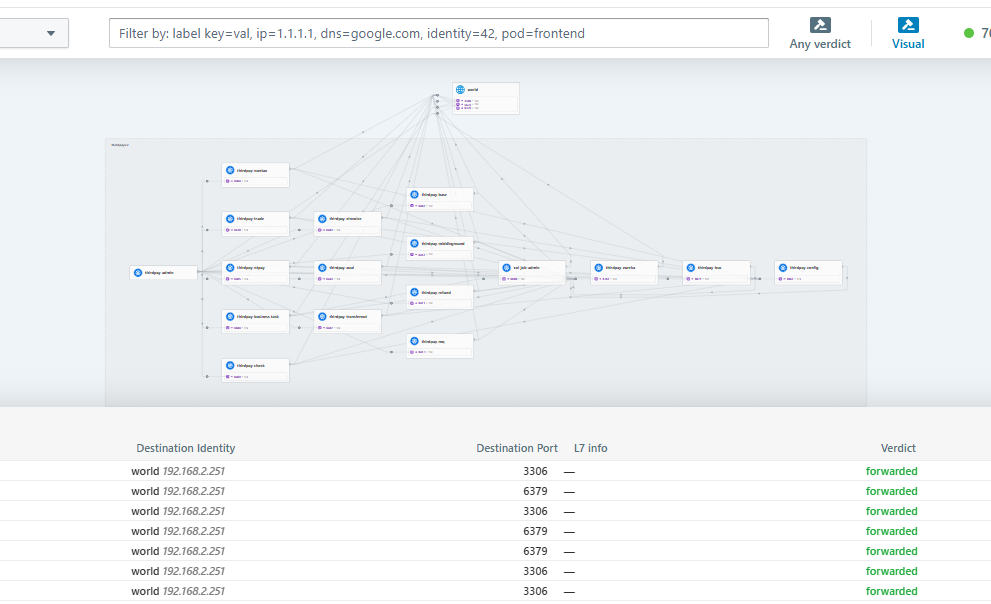
4.7.6 hubble ui应用
在安装时已启用hubble-ui,如下配置ingress
#vim hubble-ui-ingress.yaml
apiVersion: networking.k8s.io/v1
kind: Ingress
metadata:name: hubble-uinamespace: kube-systemannotations:nginx.ingress.kubernetes.io/rewrite-target: /
spec:ingressClassName: nginxrules:- host: hubble.cctbb.comhttp:paths:- path: /pathType: Prefixbackend:service:name: hubble-uiport:number: 8081
执行:
kubectl apply -f hubble-ui-ingress.yaml
root@ops-test-021:~# kubectl get ingress -n kube-system
NAME CLASS HOSTS ADDRESS PORTS AGE
hubble-ui nginx hubble.cctbb.com 10.97.156.230 80 27m
root@ops-test-021:~#
配置DNS解析
访问UI页面
http://hubble.cctbb.com
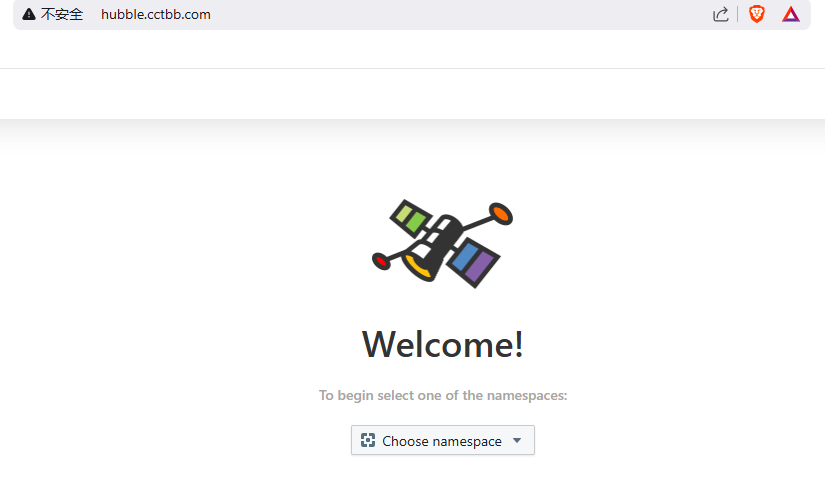
选择namespace