RabbitMQ七种工作模式介绍: - 详解
1.Simple(简单模式):
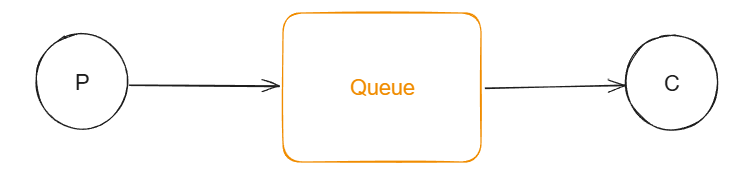
P:生产者,也就是要发送的程序。
C:消费者,消息的接受者。
Queue:消息队列,图中黄色的部分,类似一个邮箱,P可以往里面投敌消息,消费者可以从其中取出消息。
特点:一个生产者P,一个消费者C,消息只能被消费一次,也被称为点对点模式。
2.Work Queue(工作队列):
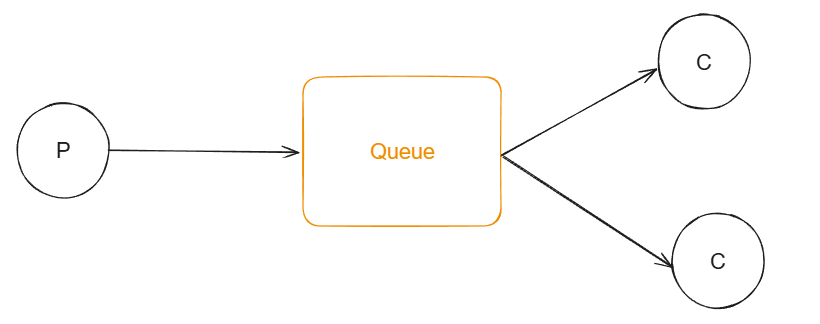
一个生产者P,多个消费者C,在多个消息的情况下,Work Queue会将消息分派给不同的消费者,也就是说每个消费者收到的消息都不同。
特点:消息不会重复,分配给不同的消费者。
交换机有关的工作模式:
在订阅模型中,多了一个交换机角色,过程略有办法。
概念介绍:
交换机(exchange)
作用:生产者将消息发送到Exchange中,然后交换机按照一定规则路由到一个或多个队列中。
RabbitMQ交换机有四种类型:fanout,direct,topic,headers,不同类型有不同的路由策略。
Fanout:广播,将所有消息交给所绑定到交换机的队列(Publish/Subscribe模式)
Direct:定向,把消息定向交给指定的routingKey的队列(Routing模式)
Topic:通配符,把消息交给符合Routing pattern(路由模式)的队列(Topics模式)
headers:headers类型的交换器不依赖于路由键的匹配规则来路由消息,而且也不实用,基本不会用到。
3.Publish/Subscribe(发布/订阅):
一个生产者P,多个消费者,这时就多了一个交换机的角色,每个消费者都能收到相同的消息。生产者发送一条消息,经过交换机转换到多个不同的队列,多个队列有多个不同的消费者。
适合场景:消息需要被多个消费者同时接收的场景,如:实时通知或者广播消息。
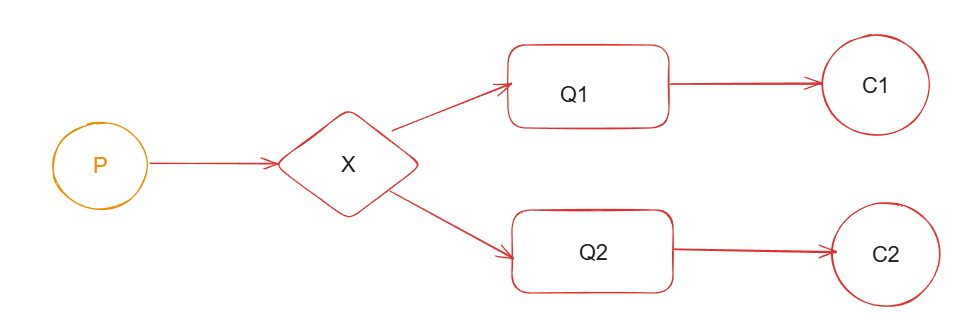
4.Routing(路由模式):
路由模式是发布订阅模式的变更,比发布订阅模式基础上,加了一个路由key,发布订阅模式是无条件将所有消息分发给所有消费者,路由模式是Exchange根据RoutingKey的规则,将数据进行匹配后发送给对应的消费者队列。
X是交换机,然后根据不同的RoutingKey(a,b,c)发送到对应的队列中。
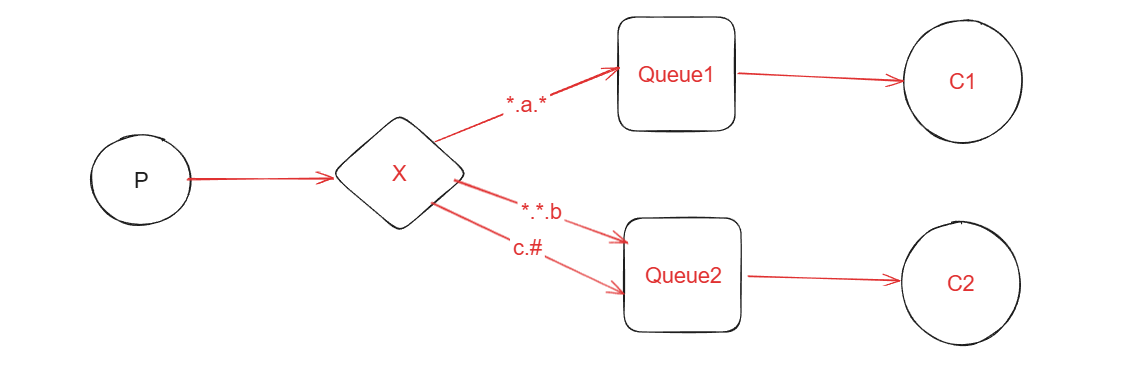
5.Topics(通配符模式):
通配符模式是路由模式的升级,在RoutingKey的基础上,增加了通配符的功能,使之更加灵活。
Topic和Routing的基本原理相同,但是匹配的规则不同,Routing是相等匹配,而topics模式是通配符匹配。
*号匹配一个且仅一个单词。
#号匹配0个或者多个单词。
6.RPC(RPC通信):
在RPC通信过程中,没有生产者和消费者,比较像咱们RPC远程调用,大概通过两个队列实现了一个可回调过程。
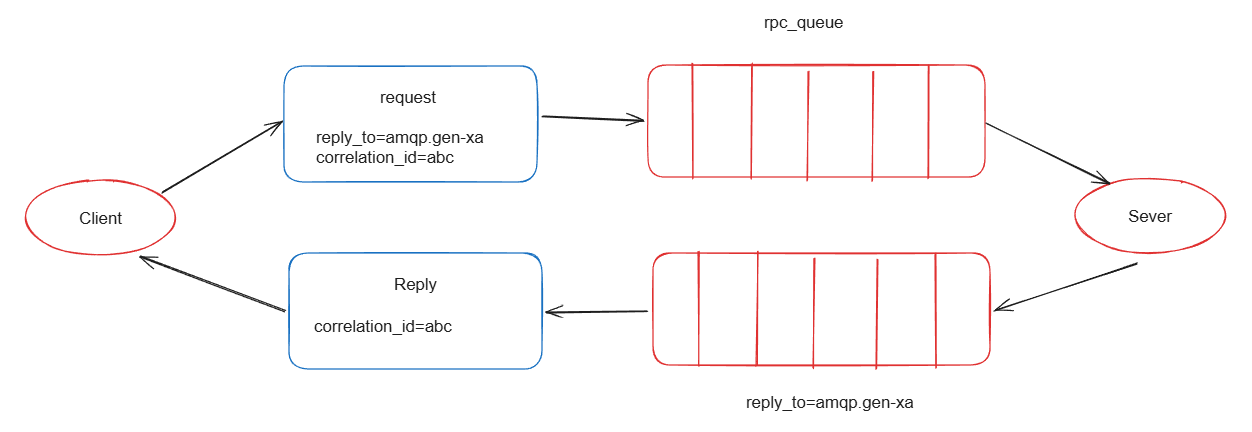
1.客户端发送一个消息到指定的队列,并且在消息属性中设置ReplyTo字段,这个字段指定了一个回到队列,用于接受服务器的响应。
2.服务器就收到消息后,处理请求并响应消息到ReplyTo指定的回调队列中。
3.客户端在回调队列上等待响应消息,一旦接收到响应,客户端会检查消息的correlationId属性,确保是不是自己期望的响应。
7.Publisher Confirm(发布确认):
Publisher Comfirm模式是RabbitMQ提供的一种确保消息可靠发送到RabbitMQ服务器的机制,这种模式下,生产者发送了消息后,可以等待RabbitMQ服务器的确认,以确保消息已经被服务器接受并处理。
1.生产者将channel设置为Confirm模式(通过调用channel.confirmSelect()完成)后,发布每一条消息都会获得一个唯一ID,生产者可以将这些序列号关联起来,追踪消息的状态。
2.当消息被RabbitMQ服务器接收并处理后,服务器会异步的向生产者发送一个确认(ACK)给生产者(包含唯一ID),表示消息已经送达。
工作队列的代码:
1.引入依赖:
com.rabbitmq amqp-client 5.25.0 2.编写生产者代码:
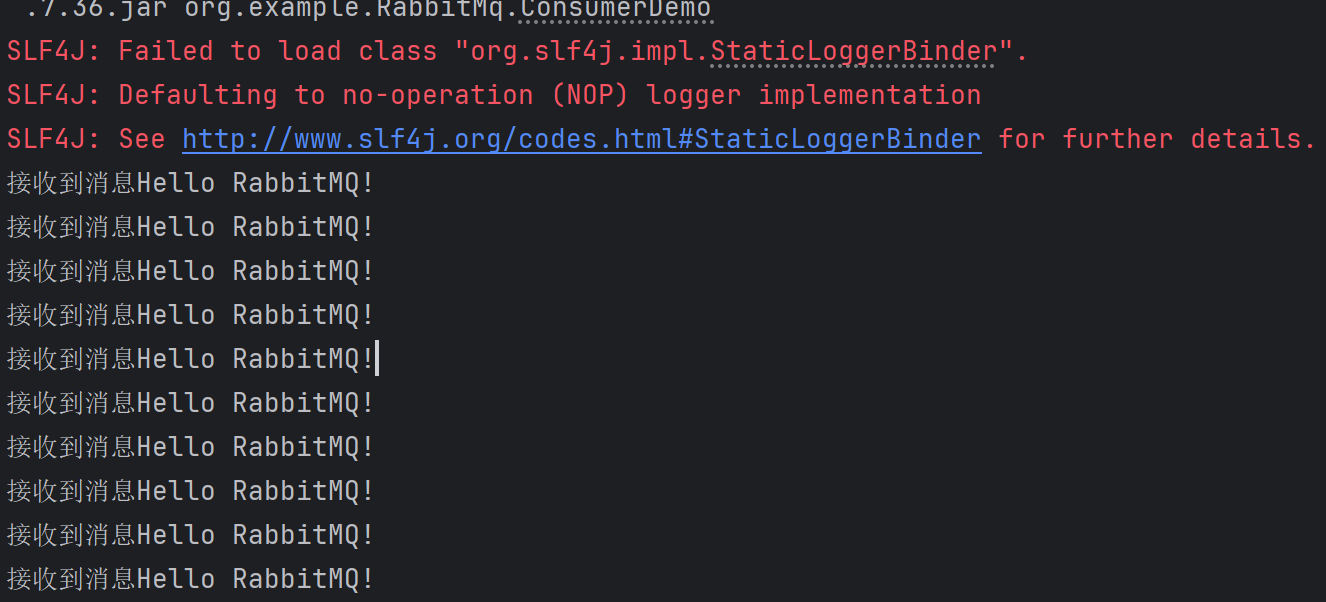
public static void main(String[] args) throws IOException, TimeoutException {//创建channel通道ConnectionFactory factory = new ConnectionFactory();factory.setHost("localhost");//默认值localhostfactory.setPort(5672);//默认值是5672factory.setUsername("guest");//用户名,默认guestfactory.setPassword("guest");//密码,默认guestfactory.setVirtualHost("Virtual host");//虚拟机的名称Connection connection=factory.newConnection();Channel channel=connection.createChannel();//声明队列,如果没有这样的队列,就会自动生成一个,如果有则不生成。channel.queueDeclare("hello",true, false, false, null);//发送消息for (int i = 0; i < 10; i++) {String message = "Hello RabbitMQ!";//发送消息,默认交换机是""channel.basicPublish("","hello",null,message.getBytes());}//释放资源channel.close();connection.close();}3.编写消费者代码:
public static void main(String[] args) throws IOException, TimeoutException {//创建channel通道ConnectionFactory connectionFactory = new ConnectionFactory();connectionFactory.setHost("localhost");//默认值localhostconnectionFactory.setPort(5672);//默认值是5672connectionFactory.setUsername("guest");//用户名,默认guestconnectionFactory.setPassword("guest");//密码,默认guestconnectionFactory.setVirtualHost("Virtual host");//虚拟机的名称Connection connection = connectionFactory.newConnection();Channel channel = connection.createChannel();//声明队列channel.queueDeclare("hello", true, false, false, null);//接收消息,并消费DefaultConsumer consumer = new DefaultConsumer(channel) {@Overridepublic void handleDelivery(String consumerTag, Envelope envelope, AMQP.BasicProperties properties, byte[] body) throws IOException {System.out.println("接收到消息"+new String(body));}};channel.basicConsume("hello",true,consumer);}运行结果:
Publish/Subscribe(发布/订阅)代码:
在发布订阅模式中,多了一个Exchange交换机。同时还有将交换机和队列进行关系绑定,以便路由到对应的队列中,给消费者消费。
1.引入依赖:
com.rabbitmq amqp-client 5.25.0 2.生产者代码:
public static void main(String[] args) throws IOException, TimeoutException {//建立channel通道ConnectionFactory factory = new ConnectionFactory();factory.setHost("localhost");//默认值localhostfactory.setPort(5672);//默认值是5672factory.setUsername("guest");//用户名,默认guestfactory.setPassword("guest");//密码,默认guestfactory.setVirtualHost("Virtual host");//虚拟机的名称Connection connection = factory.newConnection();Channel channel = connection.createChannel();//声明交换机,因为这里是发布/订阅模式,所以type是BuiltinExchangeType.FANOUTchannel.exchangeDeclare("fanout.exchange",BuiltinExchangeType.FANOUT,true,false,false,null);//声明队列,这里声明两个队列channel.queueDeclare("fanout.queue1",true,false,false,null);channel.queueDeclare("fanout.queue2",true,false,false,null);//绑定交换机和队列,后面的routinKey是匹配规则,这里的发布订阅模式所以是""channel.queueBind("fanout.queue1", "fanout.exchange","");channel.queueBind("fanout.queue2", "fanout.exchange","");//发送消息String message = "Hello fanout!!";channel.basicPublish("fanout.exchange","", null, message.getBytes());//资源释放channel.close();connection.close();}3.消费者代码:
这里有两个消费者:
消费者1代码:
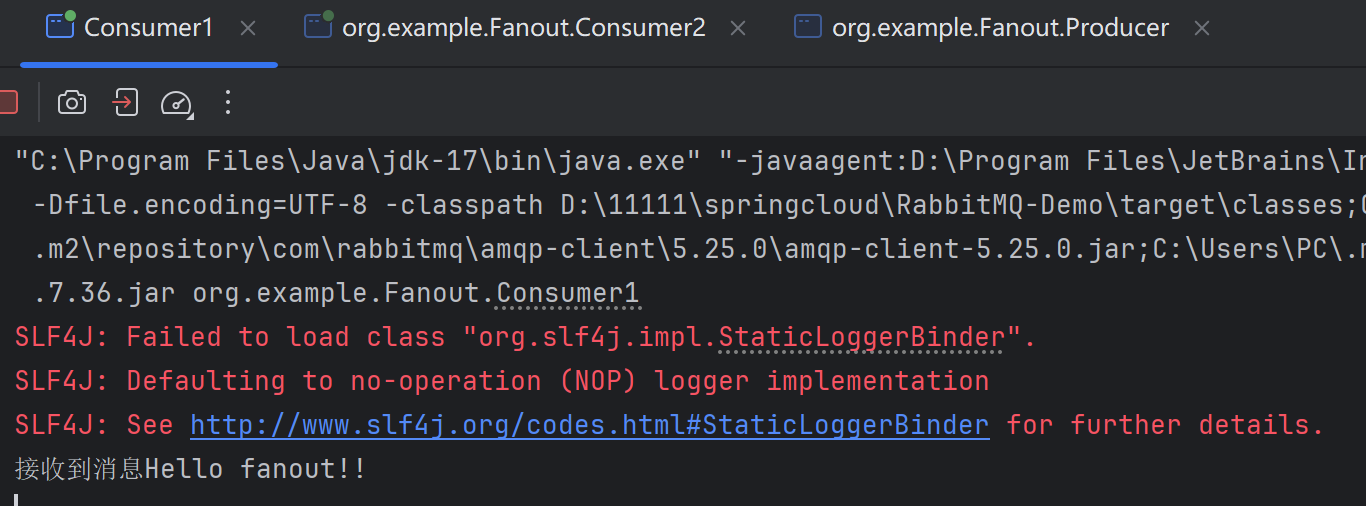
public static void main(String[] args) throws IOException, TimeoutException {//建立channel通道ConnectionFactory factory = new ConnectionFactory();factory.setHost("localhost");//默认值localhostfactory.setPort(5672);//默认值是5672factory.setUsername("guest");//用户名,默认guestfactory.setPassword("guest");//密码,默认guestfactory.setVirtualHost("Virtual host");//虚拟机的名称Connection connection = factory.newConnection();Channel channel = connection.createChannel();//声明队列channel.queueDeclare("fanout.queue1", true, false, false, null);//消费队列DefaultConsumer consumer = new DefaultConsumer(channel) {@Overridepublic void handleDelivery(String consumerTag, Envelope envelope, AMQP.BasicProperties properties, byte[] body) throws IOException {System.out.println("接收到消息"+new String(body));}};channel.basicConsume("fanout.queue1",true,consumer);}消费者2代码:
public static void main(String[] args) throws IOException, TimeoutException {ConnectionFactory factory = new ConnectionFactory();factory.setHost("localhost");//默认值localhostfactory.setPort(5672);//默认值是5672factory.setUsername("guest");//用户名,默认guestfactory.setPassword("guest");//密码,默认guestfactory.setVirtualHost("Virtual host");//虚拟机的名称Connection connection = factory.newConnection();Channel channel = connection.createChannel();channel.queueDeclare("fanout.queue2", true, false, false, null);DefaultConsumer consumer = new DefaultConsumer(channel) {@Overridepublic void handleDelivery(String consumerTag, Envelope envelope, AMQP.BasicProperties properties, byte[] body) throws IOException {System.out.println("接收到消息"+new String(body));}};channel.basicConsume("fanout.queue2",true,consumer);}运行结果:
消费者1:
消费者2:
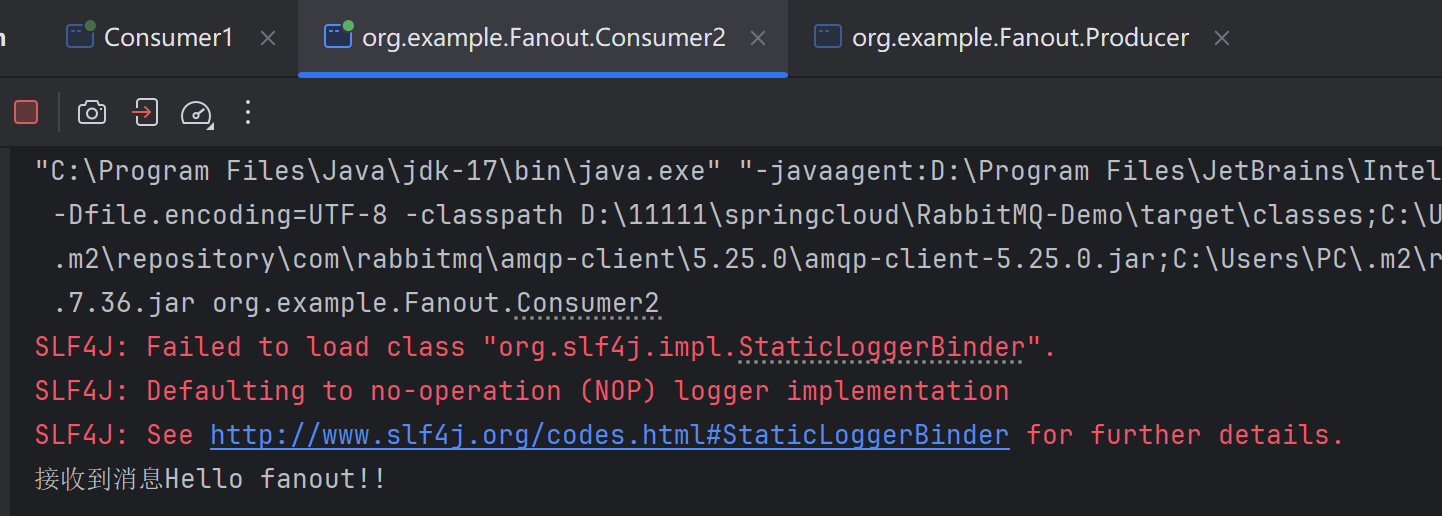
可以看出发布订阅模式中,每个消费者都收到了相同的消息。
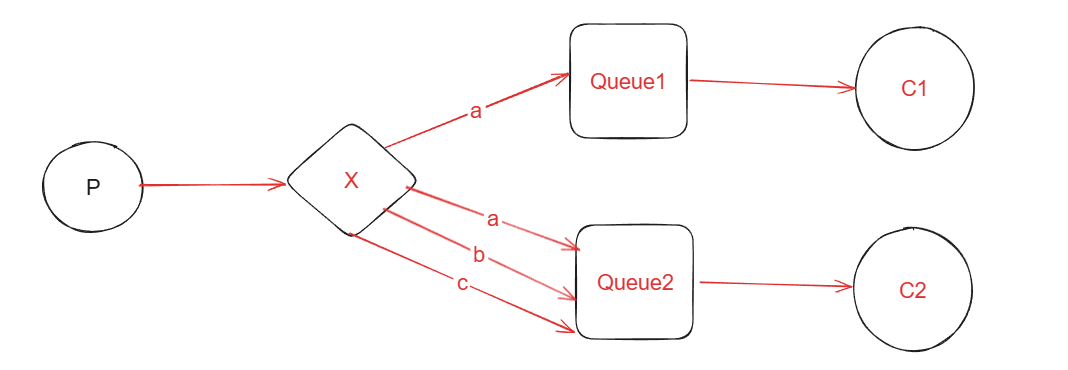
Routing(路由模式):
路由模式不同于上面的发布/订阅模式,路由模式的匹配规则不是任意绑定了,而是要指定一个BindingKey的一种。
而且生产者在像Exchange发送消息时,也需要指定消息的RoutingKey。
Exchange不再把消息交给每个绑定的key,而是根据消息的RoutingKey进行判断,只有队列绑定时的BindKey和发送消息的Routingkey完全一致时,才会收到消息。
接下来看代码实现:
1.引入依赖:
com.rabbitmq amqp-client 5.25.0 2.编写生产者代码:
这时交换机类型是DIRECT。
public static void main(String[] args) throws IOException, TimeoutException {//建立channel通道ConnectionFactory factory = new ConnectionFactory();factory.setHost("localhost");//默认值localhostfactory.setPort(5672);//默认值是5672factory.setUsername("guest");//用户名,默认guestfactory.setPassword("guest");//密码,默认guestfactory.setVirtualHost("Virtual host");//虚拟机的名称Connection connection = factory.newConnection();Channel channel = connection.createChannel();//创建交换机channel.exchangeDeclare("direct.exchange", BuiltinExchangeType.DIRECT,true,false,false,null);//声明队列channel.queueDeclare("direct.queue1", true, false, false, null);channel.queueDeclare("direct.queue2", true, false, false, null);//绑定队列和交换机的关系channel.queueBind("direct.queue1", "direct.exchange", "a");channel.queueBind("direct.queue2", "direct.exchange", "a");channel.queueBind("direct.queue2", "direct.exchange", "b");channel.queueBind("direct.queue2", "direct.exchange", "c");//发送消息String msga="hello a!";String msgb="hello b!";String msgc="hello c!";channel.basicPublish("direct.exchange", "a", null, msga.getBytes());channel.basicPublish("direct.exchange", "b", null, msgb.getBytes());channel.basicPublish("direct.exchange", "c", null, msgc.getBytes());System.out.println("消息发送成功!!!");//释放资源channel.close();connection.close();}3.编写消费者代码:
消费者1代码:
public static void main(String[] args) throws IOException, TimeoutException {ConnectionFactory factory = new ConnectionFactory();factory.setHost("localhost");//默认值localhostfactory.setPort(5672);//默认值是5672factory.setUsername("guest");//用户名,默认guestfactory.setPassword("guest");//密码,默认guestfactory.setVirtualHost("Virtual host");//虚拟机的名称Connection connection = factory.newConnection();Channel channel = connection.createChannel();//接收消息并消费DefaultConsumer consumer = new DefaultConsumer(channel) {@Overridepublic void handleDelivery(String consumerTag, Envelope envelope, AMQP.BasicProperties properties, byte[] body) throws IOException {System.out.println("接收到消息"+new String(body));}};channel.basicConsume("direct.queue1",true,consumer);}消费者2代码:
public static void main(String[] args) throws IOException, TimeoutException {ConnectionFactory factory = new ConnectionFactory();factory.setHost("localhost");//默认值localhostfactory.setPort(5672);//默认值是5672factory.setUsername("guest");//用户名,默认guestfactory.setPassword("guest");//密码,默认guestfactory.setVirtualHost("Virtual host");//虚拟机的名称Connection connection = factory.newConnection();Channel channel = connection.createChannel();//接收消息并消费DefaultConsumer consumer = new DefaultConsumer(channel) {@Overridepublic void handleDelivery(String consumerTag, Envelope envelope, AMQP.BasicProperties properties, byte[] body) throws IOException {System.out.println("接收到消息"+new String(body));}};channel.basicConsume("direct.queue2",true,consumer);}运行结果:
消费者1:

消费者2:
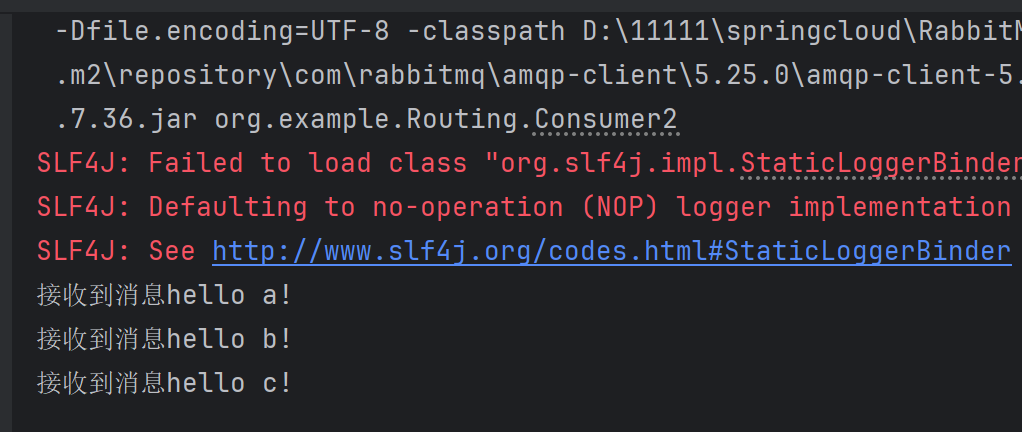
从运行结果可以看出Routing模式的规则。因为发送a消息时,只发送给了对应的消费者1,但发送a,b,c时,发送给了消费者2,因为他们二者和交换机的绑定规则不一样。
Topics(通配符模式):
这里的通配符模式,交换机类型是TOPIC
topic类型的交换机在匹配规则上进行了扩展,BindKey支持通配符匹配,direct类型的交换机的规则是Bindingkey和Routingkey完全匹配。
代码和上面的Routing模式一样,我就只写区别代码,也就是交换机和队列绑定的代码。
//声明交换机和队列channel.exchangeDeclare("topic.exchange", BuiltinExchangeType.TOPIC,true);channel.queueDeclare("topic.queue1", true, false, false, null);channel.queueDeclare("topic.queue2", true, false, false, null);//绑定交换机和队列,这里的绑定规则使用通配符绑定,*表示匹配一个且仅一个单词,#表示匹配0个或多个单词channel.queueBind("topic.queue1", "topic.exchange", "*.a.*");channel.queueBind("topic.queue2", "topic.exchange", "*.*.b");channel.queueBind("topic.queue2", "topic.exchange", "c.#");//发送消息,此时,也要注明要将消息发送哪一个交换机,并且写明BingingKey,后续根据对应的BingingKey,匹配到对应的队列中String message = "Hello A!";channel.basicPublish("topic.exchange", "e.a.f", null, message.getBytes());String message2 = "Hello B!";channel.basicPublish("topic.exchange", "ef.a.b", null, message2.getBytes());String message3 = "Hello C!";channel.basicPublish("topic.exchange", "c.ef.b", null, message3.getBytes());RPC(RPC通信):
RPC(Remote Procedure Call),即远程过程调用,它是一种通过网络从远程计算机上请求服务,而不需要了解底层网络的技术,类是与Http远程调用。
RabbitMQ实现RPC通信的过程,大概是通过两个队列实现一个可回调的过程。

大致流程如下:
1.客户端发送一个消息到一个指定的队列,并在消息属性中设置replyTo字段,这个字段指定了一个回调队列,服务端处理后,会把响应结果发送到这个队里。
2.服务端接收到请求后,处理请求并发送响应消息到replyTo指定的回调队列。
3.客户端在回调队列上等待响应的消息,一旦有消息响应,客户端就会检查消息的correlationId属性,以确保是自己想要的响应。
PRC的代码实现:
1.引入依赖:
com.rabbitmq amqp-client 5.25.0 2.客户端代码:
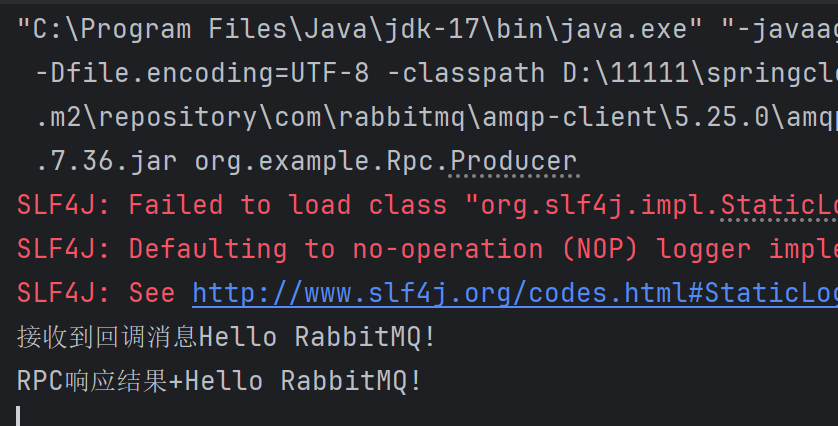
public static void main(String[] args) throws IOException, TimeoutException, InterruptedException {ConnectionFactory factory = new ConnectionFactory();factory.setHost("localhost");//默认值localhostfactory.setPort(5672);//默认值是5672factory.setUsername("guest");//用户名,默认guestfactory.setPassword("guest");//密码,默认guestfactory.setVirtualHost("Virtual host");//虚拟机的名称Connection connection = factory.newConnection();Channel channel = connection.createChannel();//声明队列channel.queueDeclare("rpc.queue", true, false, false, null);//定义回调队列channel.queueDeclare("rpc.response.queue", true, false, false, null);String message = "Hello RabbitMQ!";//本词请求的唯一标志String correlationId = UUID.randomUUID().toString();//生成发送消息的属性AMQP.BasicProperties props=new AMQP.BasicProperties().builder().correlationId(correlationId).replyTo("rpc.response.queue").build();//发送消息channel.basicPublish("", "rpc.queue", props,message.getBytes());//阻塞队列,用于储存回调结果final BlockingQueue queue = new LinkedBlockingQueue(1);//接收服务器的响应DefaultConsumer consumer = new DefaultConsumer(channel) {@Overridepublic void handleDelivery(String consumerTag, Envelope envelope, AMQP.BasicProperties properties, byte[] body) throws IOException {System.out.println("接收到回调消息" + new String(body));//进行标识判断,放到阻塞队列中if(correlationId.equals(properties.getCorrelationId())){queue.offer(new String(body));}}};channel.basicConsume("rpc.response.queue",true,consumer);//获取回调结果String result=queue.take();System.out.println("RPC响应结果+"+result);} 3.服务端代码:
public static void main(String[] args) throws IOException, TimeoutException {ConnectionFactory factory = new ConnectionFactory();factory.setHost("localhost");//默认值localhostfactory.setPort(5672);//默认值是5672factory.setUsername("guest");//用户名,默认guestfactory.setPassword("guest");//密码,默认guestfactory.setVirtualHost("Virtual host");//虚拟机的名称Connection connection = factory.newConnection();Channel channel = connection.createChannel();//设置同时只能获取一个消息channel.basicQos(1);DefaultConsumer consumer = new DefaultConsumer(channel) {@Overridepublic void handleDelivery(String consumerTag, Envelope envelope, AMQP.BasicProperties properties, byte[] body) throws IOException {System.out.println(new String(body));//处理请求,并生成返回System.out.println("接收到请求!!"+new String(body));AMQP.BasicProperties props=new AMQP.BasicProperties().builder().correlationId(properties.getCorrelationId()).build();//回复消息,通知已经收到的请求channel.basicPublish("", "rpc.response.queue", props, body);//对消息进行应答channel.basicAck(envelope.getDeliveryTag(), false);}};channel.basicConsume("rpc.queue",false,consumer);}运行结果:
客户端:
服务端:
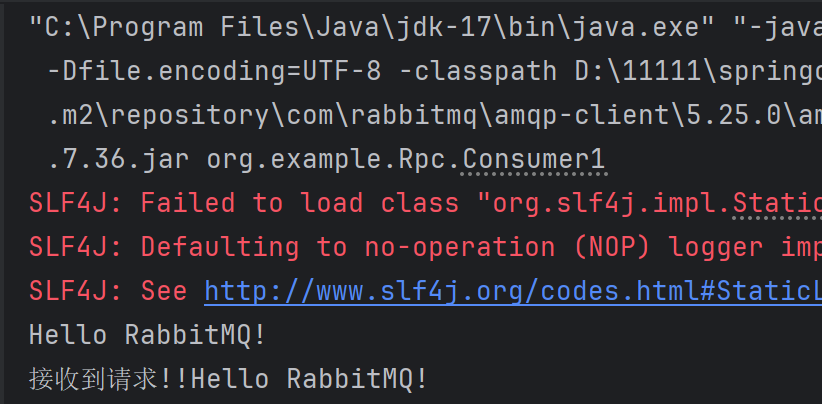
可以看出,客户端给服务端成功发送了请求,并成功处理后,服务端还给客户端进行响应请求。
还有一种发布确认模式,在后面的文章会续上。